
In the rainy fall weather of the Canadian Pacific southwest, plants like tomatoes and cucumbers can easily develop blights and mildews before the fruit is ripe. If you wander the back alleys of the once-Italian neighbourhood of Vancouver’s Commercial Drive, you will see many elderly gardeners shelter their tomatoes with overhangs of plastic sheeting.
But we wanted a full greenhouse to start seedlings in and to hold lettuce through the winter in addition to providing the shelter for heat-loving crops like melon and tomato.Life is full of compromises. We rent this land, so we make many choices hoping they will last for five to ten years. If I were planning something more permanent, I would be very interested in these passive solar greenhouses. I built this greenhouse for under CA$500, and it has withstood many fierce coastal windstorms with ease.
We had made small shelters with PVC pipe, and found the plastic pipe was too brittle. An all-wood frame seemed too finicky and would require extensive joinery or a profusion of gussets. So I decided to frame the house with Electrical Metallic Tubing—EMT—or, plain electrical conduit.
I chose a “house” shape as being an easy shape to make out of conduit—unlike arches with long and consistent curves, the pipes have a simple 45° bend. The peak roof also sheds what little snow we get here on the coast, and has adequate headspace for growing vine crops. I also designed this with an eye to using fairly simple techniques so those with a smaller workshop than I have could still create a sturdy and effective greenhouse.
Our greenhouse is 20′Please excuse my use of Imperial measurements in this article. By virtue of proximity and shared markets Canada still uses a lot of things in feet and inches, especially in construction. Furthermore, my parents immigrated from the US, so they were raised in the Imperial system. Canada only switched to metric in the 70s, so I remember special classes in elementary school to teach us metric. All of which to say, I am screwed. I measure big pieces of wood in feet and inches and short pieces in millimetres. I bake in grams but weigh apples in pounds and bottle cider by the litre. Light a candle for me. long, and about 7’4″ wide. We wanted to cover two of our garden rows with a walkway up the middle, but the size is somewhat flexible if your rows are wider or narrower. At this width, our house is almost exactly 9′ high at the peak.
The idea of the greenhouse needing to match the garden row widths could also be seen as an expression of one of my charming manias—sometimes I get an idea in my head and I can’t get it out. In this case, I was interested in Eliot Coleman’s idea of moveable greenhouses, and so I built this so four average people could pick this greenhouse up and carry it to a different spot in the garden.
- 16 pieces of ¾” EMT, standard 10′ lengths
- 8 ¾” 90°EMT elbows
- 15 feet of ⅝” square steel rod
- 4 lengths of 10′ 2×8
- 40′ of 1×8 in whatever lengths you like.
- plywood scraps
- 50 ¼” x 3″ galvanized carriage bolts, with 50 washers and nuts
- 3 ten foot long pieces of ½” rebar, cut into thirds.
You will also need 2 10′ 2×6, and eight to ten 8′ 2x6s.You will need four long 2x2s for bracing, and many other 2x2s for the end walls. Here in BC, a province built on the lumber industry, it can be shockingly difficult to get straight lumber—2x2s are often like a funhouse mirror stick of wood. It seems like the better wood is cut into larger pieces so when I care more about the end product I mill larger wood down to the size I need. I find 2x6s are often a good compromise of wood I can handle in my small shop for a good price. So a 2×6 makes three 2x2s, plus an occasionally useful offcut. After milling them down on the tablesaw I use a hand plane to quickly break the corners.
I have used fir to make many outdoor things—rabbit runs, pea trellises, tomato stakes, and this greenhouse. I find that as long as the wood is not buried I get good life without needing expensive cedar or chemical-soaked pressure-treated wood.The tomato stakes obviously do get buried, pounded at least 18″ into the ground—and they do rot quickly, giving only a couple of season’s use. Last year I painted the tips with linseed oil, and am looking forward to seeing how that preserves the stakes.
I bought plastic greenhouse sheet at our local agricultural supply, but I am sure you can order it online as well. UV in sunlight degrades plastic and reduces the amount of light that passes through the sheeting dramatically. Common hardware store plastic should be replaced after two years, while greenhouse cover will last five.
For tools I used a handsome measuring tape, an impact driver, a circular saw, a speed square, a staple gun and a hand or bench grinder. You also need a drill and a drill press if you have one. Also very nice to have are a chop saw, table saw, and a pneumatic stapler. Almost mandatory to have is a suitably sized EMT bender; I found one for ¾” tubing on Craigslist for $30. You might be able to borrow one, or rent one. You can also find solid curves out in the world—I have bent steel around parking bollards and concrete barriers…but that is definitely slower and more prone to kinking the tubing.
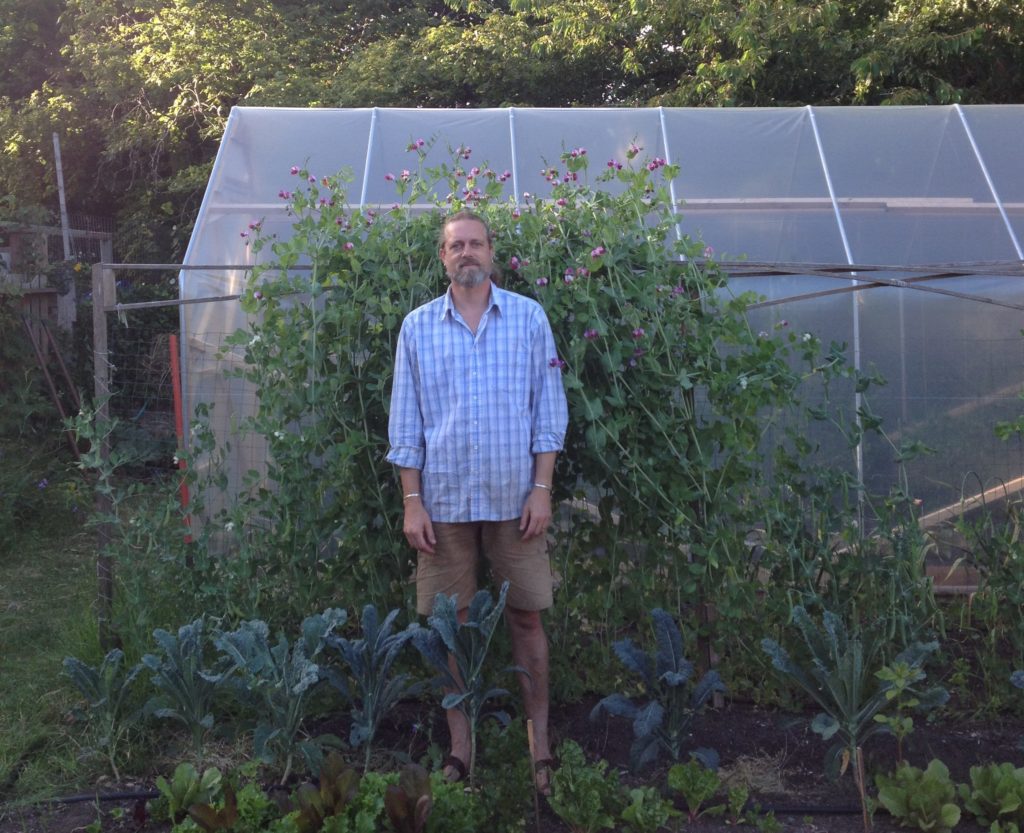
Before we begin, here is one more picture that contributes nothing to this instructional, but shows off how pretty Swedish Red Peas are—with the greenhouse in the background.
Let us begin…
As much as possible, I try to use what I call “reality-based carpentry”—rather than measuring a piece of wood and then using a tape measure to transfer that measurement to another piece of wood, whenever possible just lay the first piece on top of the second piece. This greatly reduces the opportunities to screw up numbers or read things backwards.Again, this opportunity for mistakes is in large part due to using Imperial units. I worked in a cabinet shop that used only millimetres, which avoids many problems.
Another key concept is the registration face—always measure from the same end. If you measure down one side and back up the other side your errors will compound and you will likely build a trapezoid instead of a rectangle. So pick an end and always measure from that end. For this greenhouse you want to build two mirrored sides—so mirror the damn sides. Lay the 10′ 2x8s down together and mark them Left and Right. Mark the top or the bottoms. If needed, you could lay out your measurements on both boards at the same time, measured from the same end (this is not needed for this project).
Now, rather than trying to measure the diameter of one piece of conduit, lay eight pieces side by side and measure all eight. Subtract that number from 20′, and then divide it by the seven spaces you will have between your eight EMT ribs. You should end up with something like 34″.
34″ felt like a nice space to me. I could have gone with tighter spacing, at the cost of two more lengths of EMT and one more EMT elbow, but this felt fine. I would never go for wider spacing, and if I was in an area that gets heavy snow I would cut that down to 18″ or 24″ between ribs. Check out other greenhouses that have survived good snowfalls in your area.
Cut 14 pieces of 1×8 to that length. These boards are going to be the primary way to make your greenhouse plumb, so make some effort to cut the ends square. A chop saw with a stop block is the ideal tool to make multiple identical pieces, but a carefully wielded speed square will be good enough.
Now start working with one of your 10′ 2x8s. Using one of the ¾” EMT elbows as a spacer, start from your registration end and give one EMT width, then nailAny fasteners you use on this project should be galvanized or otherwise coated. or screw one of your 14 1×8 pieces on to the 2×8, aligning them to the top edge. Move your EMT elbow to the end of that piece and butt another piece of 1×8 onto it. Repeat.
Because I have seven spaces between eight ribs, the join between my two 10′ 2x8s falls in the middle of a space. This is great, because a 1×8 piece will span the joint. So, space with your EMT elbow, butt up the 1×8, and screw the first half on. Then slide your next 2×8 underneath and line it up. Make an effort to get a straight top edge along the length of the new 20′ board. You could even stretch a string or a chalkline to ensure your eyes do not deceive you.
Keep screwing or nailing 1×8 pieces on, always spaced with a real piece of EMT, not a tape measure. When you get to the last piece, make sure your last piece of EMT will line up with the end of your 2×8. If it hangs over, trim your 1×8 a little. If against all odds it is too short, then trim your 2×8 a smidgen.
Now you have two long and heavy pieces of wood joined together by short and thin piece of 1×8, which is suboptimal. Gently roll it over and tack on another piece of wood. 1×8 would be okay, but I would suggest you use a scrap of plywood about 7″ by 30 inches and ⅝” or ¾” thick.
Now drill eight ¼”+ holes through the whole sandwich, four on each side of the join. Stay 3″ back from the ends of the wood to avoid splitting. Putting the domed head of carriage bolts on the outside (the 1×8 side), wrench them up tight.

You should now have a good, strong 20′ long base for one side of your greenhouse. Repeat for the other side, starting from the registration face.
Tangent: As you can sort of see in the pictures, I did this in a slightly different way. I started with 2 12′ and 2 10′ 2x8s and cut a long lap joint. This allowed me to geek out a bit, and also avoid having the plywood scab on the inside. You can see the lap cutting technique between 3:30 and 4:40 in this video.
Leaving these aside, it is time to make the EMT ribs.
I chose to use one 10′ length of EMT for each wall, joined at the peak by a 90° elbow. Elbows are expensive, so I could have chosen to bend the peak myself, but I knew it would be hard to get consistently matching parts when I had to make three bends in one piece of tube. By using the prefabricated elbow, I only need to put one bend in each wall tube. Besides, the elbows are sexy.
You might want to buy yourself an extra piece of EMT for practicing bends. And on that note…I called around and got a shocking range of prices, from about $10 per length of EMT at Home Depot to $3 at an electrical wholesaler. Surprisingly, even at wholesalers there was a range from $3 to $6—twice the price. It is a good idea to ask whether the wholesaler will sell to the general public. I ended up going to two wholesalers to get the best price on elbows at one place and lengths at another.
Now you need to figure out where to bend your walls into the roof. I started this process on graph paper, but then again moved to a full-scale layout. Lay lengths of tube down on the ground. Position your elbow at the peak. Move things back and forth until it seems like things are about right, and don’t rush.
I didn’t want to cut my 10′ lengths—for no other reason than laziness and an aversion to adding another opportunity to make things different lengths. This worked out great with the added length from the elbow and the two-row width we were after. This put the centre of my 45° bend, where the wall becomes the roof, at about 66″.
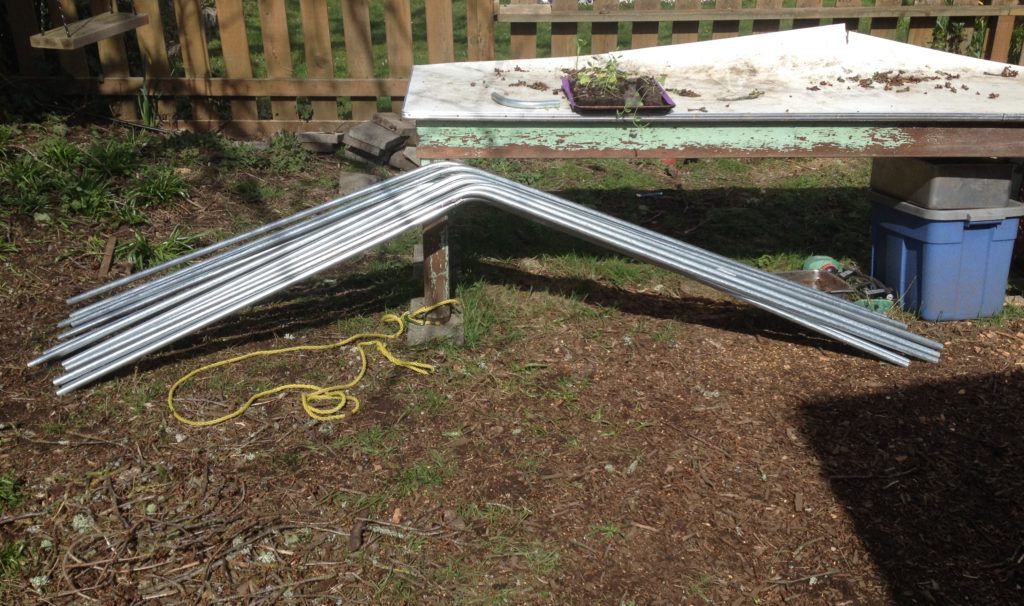
Now, I say the centre of the bend, and I am afraid I have bad news.
When you bend metal, it does not turn a 90° corner making a perfect right angle. As the metal bends, it is offset by an amount that relates to the bending tool and also the thickness of the material. This is the bend allowance, the K Factor, or the “takeup”.
So… Have fun!Here is a video on bending conduit. There are many more on youTube.
As I said, go ahead and splurge on an extra length of tubing and practice bending it. Make a mark, line up your bender on the mark, and see what happens. Where does the bend start and where does it end? How much length is taken up in the bend?
Lay your sample back down on your full-scale mock up of pipes and string and whatever, and see how things look.
Once you are happy enough, mark and bend all the tubes. Did I mention reference faces?
You can bend tubing around other things. You would need something about one foot in diameter and very solid. Maybe a tree trunk? But a conduit bender will make it easier to get matching bends and greatly reduces the risk of kinking, so I am going to assume you have begged, borrowed or stolen one.
Now here is a cute trick. My bend was at about 66″ or maybe a little more—so after the bend I had a long leg and a short leg. I laid the long leg on a table with the short leg hanging off, and let gravity plumb my pieces. Now lay your next piece beside it and you will be able to easily see how closely the angle matches.
Reference faces! Pick a tube and make it the master pattern. Adjust all the others to match the master.
Now, while you have all your tubes lying on the table with the short leg hanging off the edge and gravity pulling them all plumb, we will mark drill holes so you can bolt the tubes onto the base boards you made. You don’t want those holes going all willy-nilly.
First measure up from the end of the long leg—I am saying long leg, but that is just for my geometry. What I mean is the end of the tubing that will be touching the ground. Make a mark across each tube at 1 ¼” and 6 ¼” so the holes will land nicely within your 2×8.
With the short leg hanging off the edge, the high point of tubing on the long leg is the centre. Turn your two marks into crosses at the high point. These are your drill spots.
Once I had the spots marked I actually used the same cute trick on my drill press. I set up a support a few feet away so the long leg would be level, and the short leg would hang straight down. This made my drill holes go straight across the centre of the tubing.

If you don’t have a drill press, use a centre-punch to help your bit start, drill a small pilot hole and work your way up to slightly oversized hole for your ¼” bolts. Drill two holes in each rib.
Okay, this next part was my least favourite.
EMT is normally connected with an external clamp the tubing slides inside, tightened with screws. But using these would be bulky and would create unacceptable wear points for the plastic covering. So I researched the inside diameter of the EMT tubing, and found the diagonal measurement of the ⅝” square rod is about the same.
My idea was that I would just grind off a smidgen of the corners and hammer lengths of the rod inside the EMT. This way there would be no clamps but the joint would be reinforced with a long piece of rod.
Great in theory. It turned out that I had to grind a lot, which I tried to compensate for by brute force hammering. Once I finished, I was very pleased with the result, but I was very sweaty and unhappy in the process.
So at least you know that is coming. Take a bit of EMT to your metal supplier and see if you can find something closer in size than I found. This problem is created because the EMT is plus or minus the nominal size, as is the square rod. Perhaps I ended up with EMT on the small side and rod on the large side so the tolerances compounded unpleasantly.
There is also quite a difference in shape between hot-rolled steel and cold-rolled, so check out different materials—I wish you best of luck with that.
Once you have picked your materials, I think it would be a good idea to grind the corners off while the rod is full-length, or maybe cut in half. That just makes it easier to clamp down for safe grinding.
Then use a zip blade in your hand grinder and cut the ⅝” square rod into 16 pieces; they should be around 7″ long.
Using various hammers and rubber or wooden mallets, bash the rod into the EMT wall pieces, and then into an elbow for the peak. For me, I ended up with noodley ribs that are now shaped like a peak house. Keep going until you have ground all the rod and bashed all the ribs together.
I came up with this method to avoid abrading the plastic, but this is by far the worst part of building the greenhouse. If anybody else has found a better approach, I would love to hear it.
Okay. Set one of your base boards roughly where you want it. Slot one of your ribs into the EMT-width space in the board, eyeball it square, and clamp it in place—don’t start with the end ribs. Drill holes through the wood and run carriage bolts through, again with the domed side out where the plastic will lie. A helper to hold the noodley ribs would be quite nice at this stage.
Bring your other base board into roughly the correct position, clamp on the EMT, drill and bolt. Don’t worry about wrenching them too tight at this point. Continue to fit all the ribs.
Adjust the spacing between the base boards so the walls are vertical and cut two 2x4s to that length. Use long screws and toenail these boards across the ends, aligned with the bottom of the 2x8s. This makes a small sill you have to step/trip over, but it is not too bad.
You now have a base wooden rectangle with eight metal ribs—it should look something kind of like a greenhouse. Congratulations! Square it up.A framing square (not a speed square) will be fine for this, but the 3-4-5 method is more accurate.

At this stage the ribs were still kind of noodley, as the rods could twist inside the elbows and the wall pieces; so let’s take that noodle out.
I used six 8′ 2×2 to make braces/spaces/hanging poles for the plants. Lay one of your brace boards down on your base board and mark where the ribs actually are. This is important because the ribs can be quite noodley up in the air thanks to the top elbow joints. When you mark the where your ribs are at the bottom you ensure they will stay at the spacing at the top.
Again, we will mirror them, so clamp two braces together, and use a 1″ hole saw or spade bit to drill both pieces at the same time. When you unclamp, you have a half-hole that nicely fits over a rib.

Important! The end rib is going to be infilled with 2×2! You want your brace to be 1 ½” shorter than your base board on each end, so it will butt into the end wall.
Use 1 ½” self-tapping screws to attach the brace to the ribs. If you use six brace pieces as I did, attach one at each end, then span the gap in the middle with the third. Or use two 10′ pieces and scab them together with plywood. I attached my braces so they would be aligned with the centre of my beds. Eyeball the spot, then measure or snap a chalkline to keep it consistent.
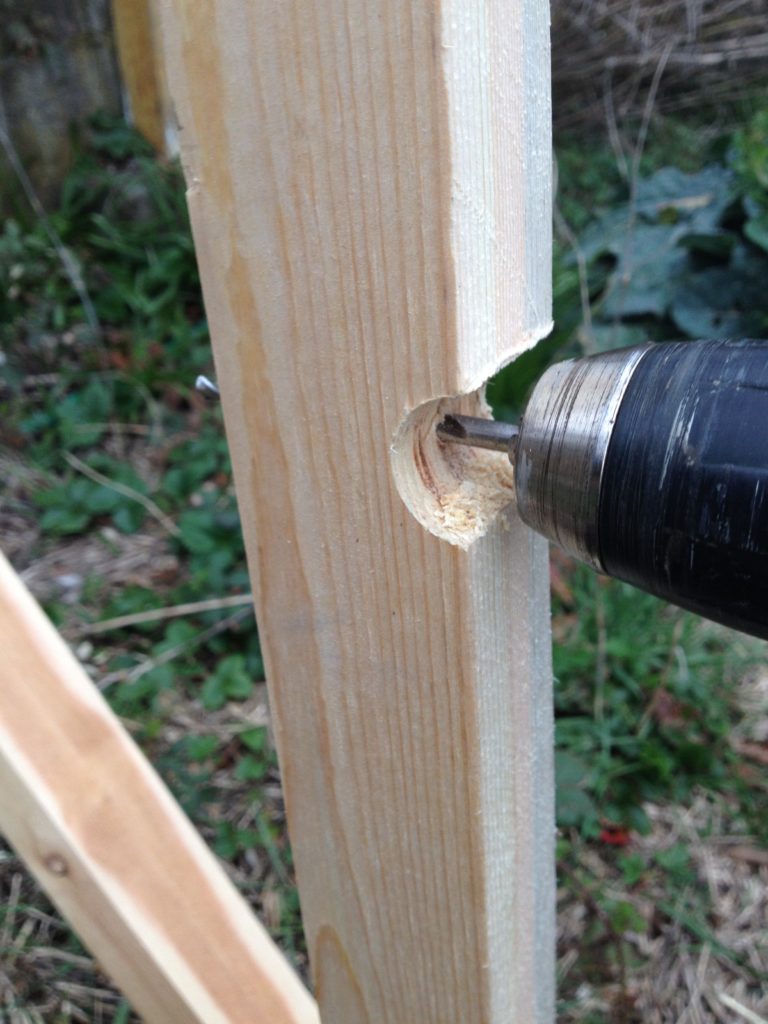
In a snowy climate, a ridge pole would be a real good idea. I didn’t think it was necessary for the coast where our snow usually comes in liquid form.
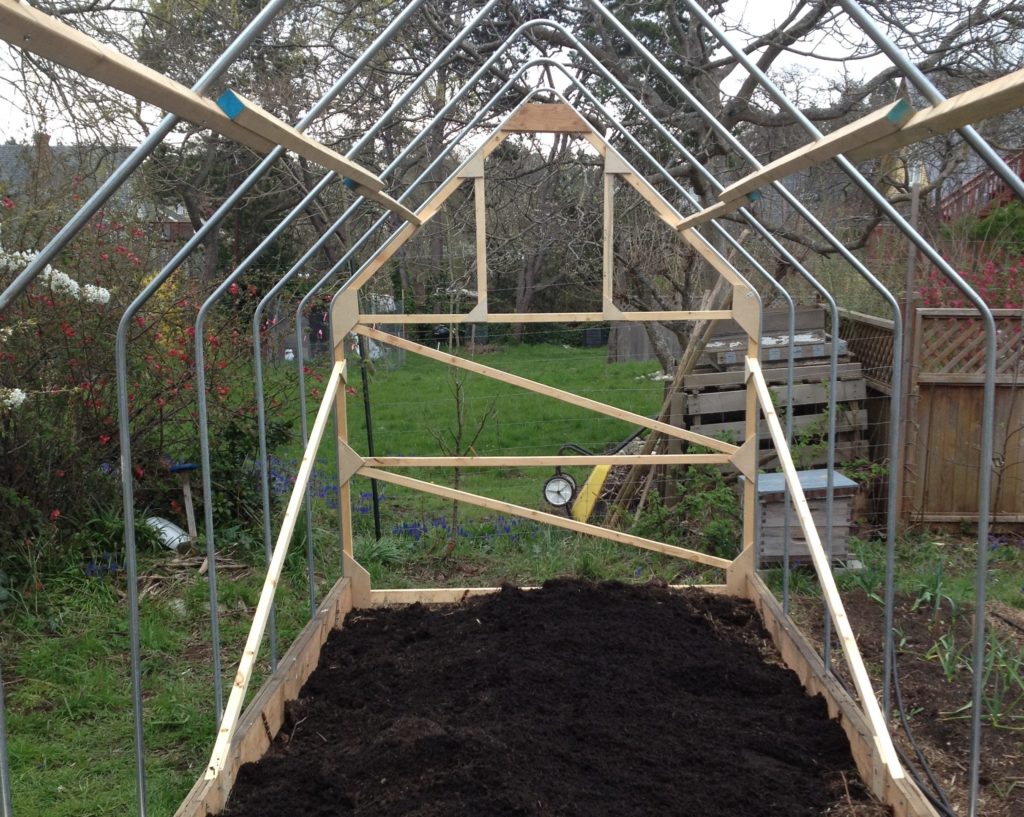
After the top braces are on to space out the ribs, wrench up the bolts at the bottom. Check your base rectangle for square again, then attach diagonal braces to the walls to buttress against the wind. I did not cut notches in the wood for these, just countersunk deep enough to give my self-tapping screws enough length to bite into the conduit and screwed them on.

Now figure out the end walls. Attach 2×2 to the EMT with self-tapping screws. Custom fit in whatever way makes sense, remembering you need a door at one end and an opening window at the other. I think my window should be larger, as it really gets hot in this house.
As you are going, glue and staple ⅜”-ish plywood gussets on to attach all the 2x2s together, to the baseboard, to the 2x4s on the end, and to the top braces. I bought a narrow crown stapler at a price that almost makes it disposable, and I am very pleased that I did. Staples are fantastic for attaching gussets like this, or for building things with chipboard or plywood. You could use screws to hold the gussets until the glue sets, but I would try to borrow or rent a stapler if you can’t find a cheap one.
It is time for a final positioning and squaring to get your greenhouse right where you want it. Then, pound in four pieces of rebar inside each baseboard. I drove them in at opposing 30° angles—the idea is to make it hard for the wind to pick up your greenhouse and blow it away. Pound three 3″ framing nails beside the rod and bend the last bit of the nail over the rebar so the greenhouse is well pinned to the ground.
And when that is all done, you can stretch the plastic—this step really calls for an assistant or two. The professionals use a cool system called wiggle wire that locks the plastic in a channel. It is removable and adjustable and even lets you attach shade cloth as needed, but it is quite pricey. I simply stapled the plastic taut onto a ½” thick lathe and rolled the wood up inside the film a couple of turns, then screwed through the whole thing to attach to the base boards. Make sure you roll to the inside so all the rain sheeting down your greenhouse does not end up rotting your lathe prematurely.
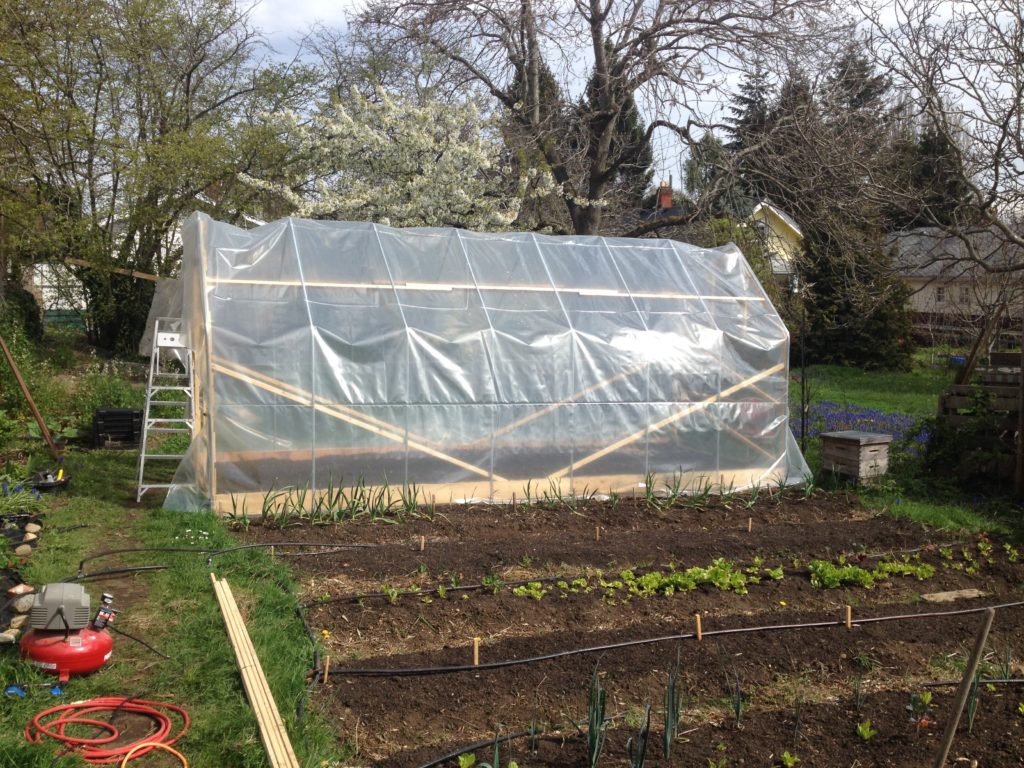
Before you stretch the top cover over onto the end walls, sheet the end walls. I ripped long lathes about 3/16″ thick and stapled through them to hold the plastic sheeting on. Then do the same for one end of the top cover, and, pulling tight!, the other end. This is thirsty work.

Futz around with doors, windows and automatic openers,Lee Valley sells expensive ones, and eBay sells less expensive ones. Shop carefully off eBay as there are many different configurations and geometries. and you have yourself a fine little greenhouse.

Hi! What a fantastic greenhouse. I assume it faired ok with the Dec 20th storm and the copious amounts of snow earlier this spring? We are on Vancouver Island (Cobble Hill) and I am considering building your greenhouse but am VERY concerned about snow weight. Would love to hear your thoughts!
Cheers!
Beth
Thanks for reading Beth.
This greenhouse has been unshakeable so far. Here in Victoria the most snow we got at once was three to four inches, which was no problem, and which slipped down and off quite quickly. I think you may get bigger dumps in Cobble Hill, but I think if you added a ridgepole of 2X2s, just notched and screwed on like the others, it would be more than strong enough. If you want to be real classy run a plane over the top of the ridgepole to bevel the corners to kind of match the angle of the plastic—just to reduce chafing on the plastic.
Have fun!
Looks good… or perhaps more exacting – it looks great. [isn’t great an order of magnitude better than good?].
But what we really want to know is how much the finished product weighs. Alternately, we will need to know how stout the three friends who will help move this beast need to be. My obvious concern is that four average Canadians might be significantly different than four average Ohioans.
And further – shouldn’t there be a second GH built and covered in a soy based plastic such that comparison might be made and a nod to sustainability teased from the research results? I know a soybean research funding agency that might be persuaded to back such a plan.
Finally, as a Certified American Quibbler* I ought to first stipulate that Swedish Red Peas truly are pretty and work well against a greenhouse backdrop. But what, for all that’s pretty, are we doing with the bloke in front of the peas??
* BTW, CAQ membership is open to Canadians – as it should be. Canada being such a significant part of North America it would seem foolish leave them off. For those on your side of the border who would reject such a notion (being included as Americans) you could start a CCQ, and there might a justifiable quibble there to make it worthwhile. But I digress.
Those are some serious quibbles—you really earned your merit badge.